How to Change the IP Address of Your WiFi Router: A Step-by-Step Guide
Let’s be honest – anything involving router settings sounds more complicated than it usually is. Words like “gateway IP”, “subnet mask”, and “admin console” have a way of making perfectly reasonable tasks feel like they require a computer science degree.
They don’t. Changing your WiFi router’s IP address is something most people can do in under five minutes – once they know where to look and what to click. This guide walks you through exactly that, step by step, in plain English.
This guide works for all major router brands – TP-Link, Netgear, Asus, D-Link, Linksys, Cisco, and more. The menu names may look slightly different, but the process is the same.
What is a router IP address?
Your WiFi router has two IP addresses. It’s worth knowing which one you’re changing – because they do very different things.
- Local (LAN) IP address – This is the address your router uses inside your home or office network. It’s how your devices (laptops, phones, smart TVs) communicate with the router. The default is usually something like
192.168.1.1or192.168.0.1. This is what most people want to change. - Public (WAN) IP address – This is the address your router shows to the internet. It’s assigned by your ISP, and you typically can’t change it permanently unless your ISP gives you a static IP. Restarting your router sometimes gets you a new one.
In this guide, we’re focusing on changing your local IP address – the one that controls how your internal network is organized.
Why would you want to change your router’s IP address?
Good question – and there are more reasons than you might expect:
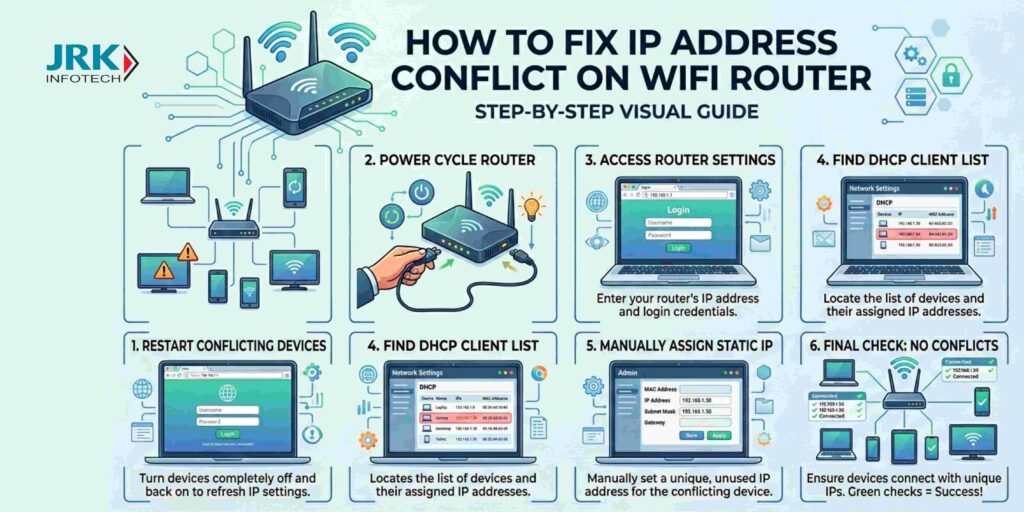
- IP address conflict. Two devices on your network are fighting over the same address, causing dropped connections or devices that simply won’t connect.
- Connecting two routers. If you’re setting up a second router and both have the same default IP (e.g. 192.168.1.1), you’ll have a conflict. One needs to change.
- Security. Hackers know the default IPs for every major router brand. Changing yours makes it slightly harder for anyone probing your network.
- Network reorganization. You’re setting up a more structured home or office network and want to use a specific IP range.
- ISP or VPN issues. Your current IP range is conflicting with your VPN’s IP range, causing traffic to route incorrectly.
Before you start: what you’ll need
Heads up: Changing your router’s IP address will briefly disconnect all devices on your network. They’ll reconnect automatically – but you’ll need to re-enter the new IP in your browser to get back into your router’s admin panel.
Here’s what to have ready before you begin:
- A device connected to your router – via WiFi or ethernet cable. Ethernet is more reliable for this task.
- Your router’s current admin IP – usually printed on a sticker on the bottom or back of your router. Common defaults:
192.168.1.1,192.168.0.1, or10.0.0.1. - Your router’s admin username and password – also on the sticker. If you’ve changed it and forgotten it, you may need to factory reset your router first.
- Your new IP address picked out – stay in the same range (e.g. if you’re on 192.168.1.x, change to 192.168.2.1). Don’t use an address already taken by a device on your network.
Step-by-step: how to change your router’s IP address
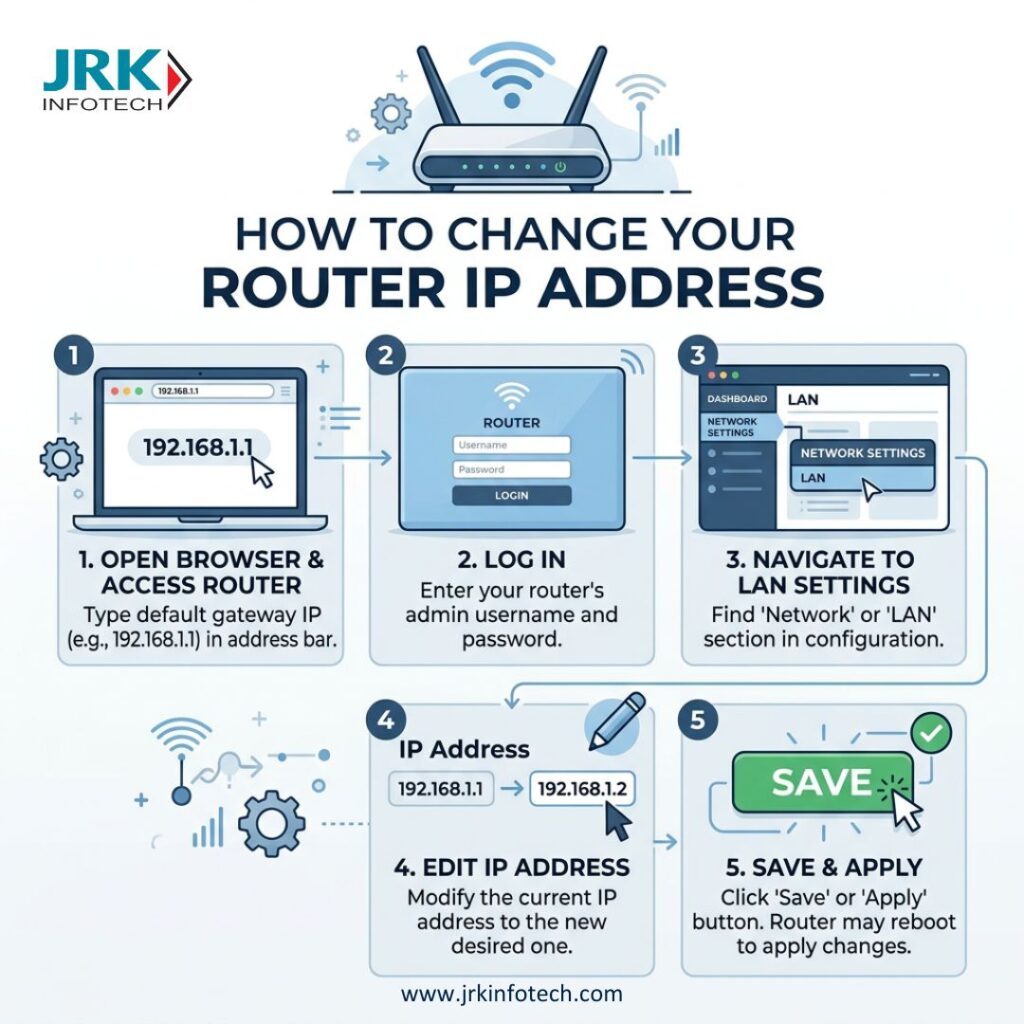
1: Open your router’s admin panel
Open any web browser (Chrome, Firefox, Safari – any will do) and type your router’s current IP address into the address bar. Hit Enter.
http://192.168.1.1 or http://192.168.0.1
Not sure what your router’s IP is? On Windows, open Command Prompt and type ipconfig – look for “Default Gateway”. On Mac, go to System Settings → Network → your connection → Details → TCP/IP tab.
2: Log in with your admin credentials
You’ll see a login page. Enter your router’s admin username and password. These are usually printed on the sticker on your router – look for “Admin”, “Username”, or “Password” labels.
Common defaults if nothing is printed: username admin / password admin or password.
3: Navigate to LAN settings
Once inside the admin panel, look for a section called LAN, Network, Local Network, or LAN Settings. The exact label varies by brand but the concept is the same on every router.
Common paths by brand:
TP-Link: Advanced → Network → LAN
Netgear: Advanced → Setup → LAN Setup
Asus: LAN → LAN IP
D-Link: Setup → Network Settings
Linksys: Connectivity → Local Network
4: Change the IP address
You’ll see a field labelled IP Address or Router IP. This is the one you’re changing.
Type in your new IP address. Keep the first three sections the same and only change the last number — or change the third section for a different subnet entirely. For example:
192.168.1.1 → 192.168.2.1
Leave the subnet mask as is – 255.255.255.0 — unless you know what you’re doing.
5: Save and reconnect
Click Save or Apply. Your router will restart – this usually takes 30–60 seconds.
Once it’s back up, your browser will lose the connection to the admin panel (because the old IP no longer exists). Type your new IP address into the browser to get back in.
Your devices will reconnect to the WiFi automatically. If any device doesn’t reconnect, disconnect and reconnect it manually from WiFi settings.
Pro tip: Write down your new IP address before you save – or take a photo of the screen. You’ll need it to access your router’s admin panel in the future.
How to find your router’s IP by device
If you’re not sure what your current router IP is, here’s how to find it on every major platform:
Windows
- Press Win + R, type
cmd, hit Enter - Type
ipconfigand press Enter - Look for “Default Gateway”
- That number is your router IP
Mac
- Open System Settings
- Click Network → your connection
- Click Details → TCP/IP tab
- See “Router” for the IP
iPhone / iPad
- Go to Settings → WiFi
- Tap the (i) next to your network
- Scroll down to “Router”
- That’s your router’s IP
Android
- Go to Settings → WiFi
- Long press your network name
- Tap “Manage network settings”
- See Gateway for the IP
Troubleshooting common issues
Can’t access the router admin panel after changing the IP
This is the most common issue – and it’s not a problem. You just need to type the new IP address into your browser instead of the old one. If you’ve forgotten what you changed it to, check your device’s “Default Gateway” using the steps above – it will show the new IP.
Devices won’t reconnect after the change
Turn WiFi off and on again on any device that won’t connect. If that doesn’t work, forget the network entirely and reconnect fresh. Your WiFi name and password haven’t changed – just the internal router IP.
“IP address conflict” message still appearing
Make sure your new router IP doesn’t fall within the DHCP range your router uses to assign addresses to devices. For example, if your DHCP pool is 192.168.1.100–200, set your router IP to something like 192.168.1.1 or 192.168.1.254 to avoid overlap.
Forgot the new IP and can’t log in at all
Use the “Default Gateway” method above on any connected device – it will always show you the current router IP. As a last resort, a factory reset will restore the original default IP (printed on your router’s sticker).
“The most intimidating part of changing your router’s IP address is navigating the admin panel for the first time. Once you’ve done it once, it takes two minutes.”
Tips to stay connected and secure after the change
- Bookmark your new router admin URL. Save it as
http://[your-new-ip]so you never have to remember it again. - Update any static IP devices. If any devices (printers, NAS drives, smart home hubs) have manually assigned static IPs on your old subnet, update them to match the new range.
- Change your admin password while you’re in there. If it’s still set to the default, now is the perfect time to set a strong, unique password.
- Note your DHCP range. Make sure your router’s DHCP range is updated to match the new IP if needed – so it assigns addresses in the right subnet.
Frequently asked questions
Will changing my router’s IP address disconnect all my devices?
Yes, briefly. When you save the new IP, your router restarts – which temporarily drops all connections. Devices will reconnect automatically within a minute or two. You won’t need to re-enter your WiFi password.
What is the default IP address for most WiFi routers?
The most common default router IP addresses are 192.168.1.1, 192.168.0.1, and 10.0.0.1. The exact default for your router is usually printed on a sticker on the bottom or back of the device.
Can I change my router’s public IP address?
Not directly – your public IP is assigned by your ISP and you can’t control it from your router settings. Restarting your router may give you a new public IP if your ISP uses dynamic IP assignment. For a permanent change, you’d need to contact your ISP or use a VPN.
Does changing the router IP change my WiFi password?
No. Your WiFi name (SSID) and password are completely separate from the router’s LAN IP address. Changing the IP has no effect on your wireless credentials.
What should I do if I can’t remember my new router IP?
Check the “Default Gateway” on any device connected to your network – it always shows the current router IP. On Windows, open Command Prompt and type ipconfig. On Mac, go to System Settings → Network → Details → TCP/IP. On iPhone, go to Settings → WiFi → tap the (i) next to your network.
Is it safe to change my router’s IP address?
Completely safe – as long as you choose a valid private IP address in the correct range (192.168.x.x, 10.x.x.x, or 172.16.x.x to 172.31.x.x). You won’t damage your router or break your internet connection permanently. If something goes wrong, a factory reset will restore everything to default.
How do I change my router’s IP on a specific brand?
The process is the same across all brands – access the admin panel via your browser, navigate to LAN settings, and change the IP field. The menu names vary slightly: TP-Link uses “Advanced → Network → LAN”, Netgear uses “Advanced → Setup → LAN Setup”, and Asus uses “LAN → LAN IP”. All router brands follow the same core steps.